Kids’ Bike Sizing Guide (2026) — Size Chart by Age & Height
Quick Answer
Kids’ bikes are sized by wheel diameter, not frame size. Most children 3’5″–3’9″ (105–118cm) fit 14–16″ wheels. Use height and inseam first—age is only a rough guide. For beginners, ensure they can touch the ground with both feet flat while seated.
About This Sizing Guide
This guide synthesizes sizing recommendations from leading kids’ bike manufacturers (Trek, Woom, Guardian, Specialized) and child development research. While we specialize in e-bike law and regulation, we maintain these sizing resources as a reference for families.
For the best fit—especially for a child’s first bike or if between sizes—we recommend visiting a local bike shop where your child can test ride different options.
Information compiled from manufacturer specifications and CPSC safety standards. Last reviewedHow Are Kids’ Bikes Sized?
Unlike adult bikes (measured by frame size), kids’ bikes are sized by wheel diameter—12″, 14″, 16″, 20″, or 24″. As wheel size increases, so does the overall bike frame. Height and inseam are the best indicators of a safe, confidence-building fit.
The same wheel size from different brands can fit very differently. Two 20″ bikes might have minimum seat heights that vary by up to 5 inches, so always check the specific bike’s seat height range against your child’s inseam.
Kids’ Bike Size Chart (Age • Height • Wheel)
| Rider Height | Centimeters | Inseam (cm/in) | Age Range | Wheel Size |
|---|---|---|---|---|
| Up to 3′ | Up to 90cm | 28–38cm (11–15″) | 18 mo – 3 yrs | Balance bike (12″) |
| 3′ – 3’5″ | 90 – 105cm | 35–42cm (14–16″) | 2 – 4 years | 12″ wheels |
| 3’5″ – 3’9″ | 105 – 118cm | 40–50cm (16–20″) | 4 – 6 years | 14–16″ wheels |
| 3’9″ – 4’5″ | 118 – 135cm | 48–58cm (19–23″) | 5 – 9 years | 18–20″ wheels |
| 4’5″ – 5′ | 135 – 150cm | 55–65cm (22–26″) | 8 – 12 years | 24″ wheels |
| 5′ + | 150cm + | 65cm+ (26″+) | 11+ years | 26″ / Adult XS |
Height is your starting point; inseam confirms safe stand-over. Children grow fast—prioritize control and confidence over “growing into” a bike.
Balance Bike vs. Training Wheels
How your child learns to ride affects both their development and future bike sizing. Here’s what research and cycling educators have found:
Balance Bikes
RecommendedHow they work: No pedals—children push with their feet and learn to balance first.
- Children learn to ride earlier (avg. age 4 vs. 6)
- Teaches balance before pedaling complexity
- Lighter weight, easier for small children
- Smoother transition to pedal bikes
- Works on grass, gravel, varied terrain
Best for: Ages 18 months to 4 years
Training Wheels
TraditionalHow they work: Extra wheels prevent tipping while child learns to pedal.
- Can be added to most kids’ bikes
- Familiar approach for many parents
- Good for older children just starting
- Includes brakes from the beginning
- Child learns pedaling mechanics early
Best for: Ages 3–6, especially late starters
Research insight: A study of over 2,000 children found that those who used balance bikes learned to ride independently at an average age of 4.2 years, compared to 6 years for children who started with training wheels. Balance bikes teach the hardest skill—balancing—first.
Seat Height by Experience Level
The right seat height depends on your child’s riding experience, not just their inseam measurement:
Balance Bike Riders
Seat height: 0.5″ to 1.5″ below inseam
Feet should be flat on the ground with knees slightly bent in an athletic stance. This allows efficient pushing and instant stability.
First Pedal Bike / Training Wheels
Seat height: Equal to inseam, up to 2″ above
Child should touch ground with toes or balls of feet. This builds confidence for stopping and starting safely.
Experienced Riders
Seat height: 2″ to 4″ above inseam
Higher seat allows proper leg extension for efficient pedaling. Child stops by leaning bike and touching one foot down.
Between Sizes? Here’s How to Decide
👉 If your child falls between two wheel sizes…
- New to pedaling or lacks confidence
- Needs flat-foot ground contact for safety
- Shorter torso or arms for their height
- Will be riding on challenging terrain
- Prioritizing safety and skill-building
- Experienced and confident rider
- Good balance from balance bike background
- Tall for their age with long legs
- Will mostly ride on flat, paved surfaces
- About to have a growth spurt
Safety first: A bike that’s slightly too small is far safer than one that’s too big. An oversized bike is harder to control, reduces confidence, and can lead to crashes. Don’t buy big to “grow into”—it often backfires.
How to Measure a Child’s Inseam
- Have your child stand against a wall with shoes off and feet slightly apart (about hip-width).
- Place a hardcover book between their legs, spine facing up, to simulate a bike saddle.
- Raise the book gently until it meets resistance at the crotch—use firm but comfortable pressure.
- Mark where the top of the book spine meets the wall.
- Measure from the floor to the mark—that’s the inseam measurement.
Pro tip: Measure in the shoes and pants they’ll typically wear while riding for the most accurate fit.
Common Kids’ Bike Sizing Mistakes
- Buying too big to “grow into”: An oversized bike is harder to control, reduces confidence, and can cause crashes. A properly fitted bike—even if outgrown in a year—is safer and more enjoyable.
- Using only age to determine size: A tall 4-year-old and a small 6-year-old might need the same bike. Always measure height and inseam—age is only a rough starting point.
- Assuming all same-wheel-size bikes fit alike: Two 20″ bikes can have minimum seat heights differing by 5 inches. Check the specific bike’s seat height range against your child’s inseam.
- Ignoring weight: Heavy bikes (common from big-box stores) are much harder for children to control. A bike shouldn’t weigh more than 30–40% of the child’s body weight.
- Skipping the test ride: Charts are starting points. A child who feels confident and excited on a bike during a test ride has found the right fit.
Why Kids-Specific Bike Design Matters
Quality kids’ bike brands don’t simply shrink adult bikes—they redesign geometry specifically for children’s proportions and learning needs:
Low Center of Gravity
A lower center of gravity makes balancing significantly easier for new riders. Kids-specific bikes position the child’s weight lower, reducing the “tippy” feeling that causes anxiety and crashes.
Longer Wheelbase
The wheelbase is the distance between where the two wheels touch the ground. Longer wheelbases create more stability and reduce “twitchiness,” helping children ride in a straight line with confidence.
Low Standover Height
A low frame makes mounting and dismounting easier, and gives children confidence that they can quickly put their feet down. This is especially important for new riders who may need to bail off frequently.
Look for these features: Brands like Woom, Guardian, Prevelo, and Biky specifically engineer their frames with child-optimized geometry. Budget bikes from big-box stores often use scaled-down adult geometry, which makes learning harder.
The “Pedals-Off” Transition Method
Many cycling educators and quality bike brands recommend removing the pedals from a pedal bike to help children transition from balance bikes—or to learn balance if they skipped that step:
How it works: Remove both pedals using a wrench (left pedal loosens clockwise, right pedal loosens counter-clockwise). Lower the seat so your child can sit and place both feet flat on the ground. Let them scoot and glide like a balance bike until they can coast with feet up for several seconds.
When to add pedals back: Once your child can glide confidently with feet up, maintain balance through turns, and use the hand brakes effectively, reinstall the pedals. The transition to pedaling is usually quick—often within a single session.
Convertible bikes: Some brands (like Strider 14x, LittleBig, and Kidvelo Rookie) sell bikes specifically designed for this transition, with easy-install pedal kits that transform balance bikes into pedal bikes on the same frame.
Safety Features to Look For
- Reflectors & lights: Front, rear, wheel, and pedal reflectors improve visibility. Required by CPSC standards on all bikes sold in the U.S.
- Chain guard: Protects fingers and clothing from getting caught in the chain mechanism.
- Appropriately sized brake levers: Hand brakes should be reachable by small hands with predictable lever feel. Many quality kids’ bikes have adjustable reach.
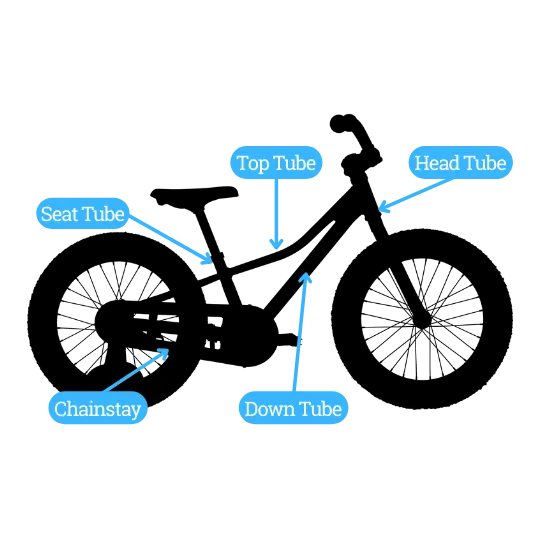
- Low stand-over height: Frame should allow easy mounting/dismounting with clearance between the top tube and child.
- Certified standards: Look for bikes meeting CPSC 16 CFR 1512 bicycle requirements.
Adjustability for Growing Kids
Seat height: Should allow slight knee bend at bottom of pedal stroke. Check manufacturer’s min/max seat post range—more range = longer usability.
Handlebar height: Upright position helps new riders see ahead and maintain balance. Some bikes offer adjustable stems for growing children.
Brake lever reach: Quality kids’ bikes allow adjustment for smaller hands. If your child can’t comfortably squeeze the brakes, the bike isn’t right yet.
When to upgrade: Time to size up when the seat is maxed out and knees still bend too much, the child looks cramped, or they can no longer comfortably reach handlebars.
Manufacturer Sizing Tools & Safety Standards
Kids’ Bike Brand Sizing Guides:
Safety Standards & Resources:
Frequently Asked Questions
What size bike does my 5-year-old need?
Most 5-year-olds fit a 16″ or 18″ wheel bike, but height matters more than age. A child who is 3’9″–4’2″ (115–127cm) typically fits a 16″ bike. Measure their height and inseam, then compare to the size chart above. If between sizes and they’re confident riders, size up; if newer to riding, size down for safety.
Should I get a balance bike or training wheels?
Balance bikes are generally recommended by cycling educators. Research shows children learn to ride earlier with balance bikes (average age 4) compared to training wheels (average age 6). Balance bikes teach the crucial skill of balancing first, making the transition to pedals smoother. Training wheels remain a valid option, especially for older children just starting out.
Should I buy a bigger bike so my child can grow into it?
No—this is one of the most common and problematic mistakes. An oversized bike is harder to control, reduces confidence, and can cause crashes. A properly fitted bike now, even if outgrown in 12–18 months, is far safer and more enjoyable. Many brands offer trade-in programs that credit you toward the next size.
How do I know when my child needs a bigger bike?
Time to size up when: the seat is at maximum height and their knees still bend too much at the bottom of the pedal stroke, they look cramped on the bike, they can no longer comfortably reach the handlebars, or their stand-over clearance is inadequate. Don’t wait until they completely outgrow it—start shopping when you notice these signs.
Why do two bikes with the same wheel size fit differently?
Wheel size determines the tire diameter, but frame geometry varies significantly between brands. The minimum seat height of two 20″ bikes can differ by up to 5 inches. Always check the specific bike’s seat height range and compare it to your child’s inseam—don’t assume same wheel size means same fit.
Is my child ready to transition from training wheels?
Signs they’re ready: they can coast with training wheels barely touching the ground, they show good balance and steering control, and they’re eager to try without the extra wheels. Consider removing the pedals first and letting them practice balancing (like a balance bike) before adding pedals back for the full transition.